Octopress の記事を org-mode で
はじめに
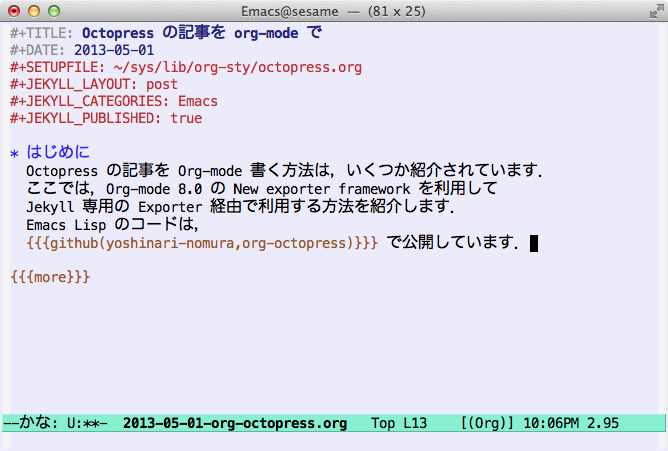
Octopress の記事を Org-mode 書く方法は,いくつか紹介されています. ここでは,Org-mode 8.0 の New exporter framework を利用して Jekyll 専用の Exporter 経由で利用する方法を紹介します. Emacs Lisp のコードは, org-octopress で公開しています.
スクリーンショット
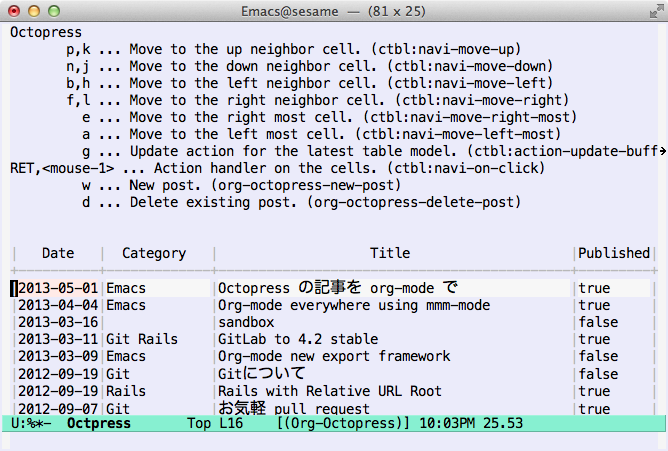
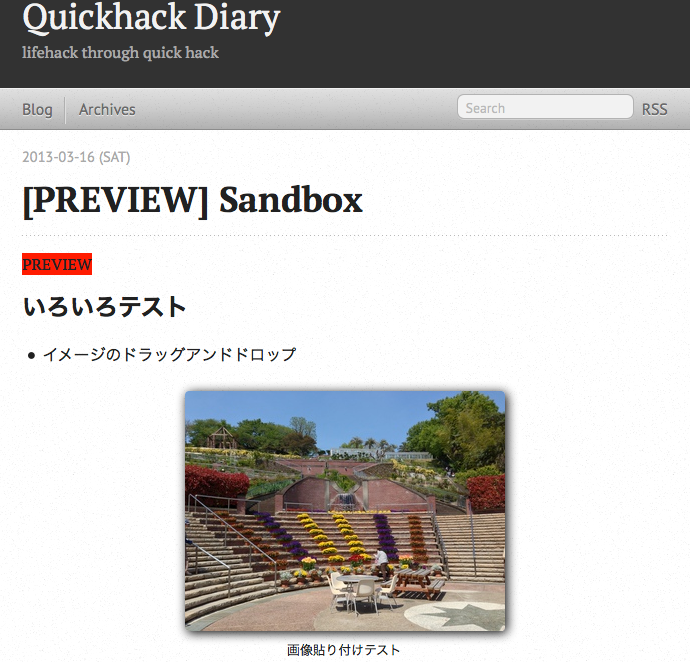
まず,使っているイメージから.


Octopress の準備
これは,普通の Octopress 設定方法です.既にインストールしてある人は飛ばしてOKです. 本家の解説は,こちら: Octopress Setup - Octopress
git, rvm (rvenv), ruby 1.9.3 が入っていることが前提です.
% rvm install 1.9.3
% rvm use 1.9.3
% rvm gemset create octopress
% rvm gemset use octopress
% git clone git://github.com/imathis/octopress.git octopress
% echo 'rvm use 1.9.3@octopress' > octopress/.rvmrc
% cd octopress # If you use RVM, You'll be asked if you trust the .rvmrc file (say yes).
% gem install bundler
% mkdir -p vendor/bundle
% bundle install --path vendor/bundle
blog ブランチを切って,チェックアウトします.
% git checkout -b blog
% git add .rvmrc
% git commit -m 'rvm to use octopress gemset'
テーマファイルをコピーします.
% rake install
手でコピーするとこんな感じ:
## Copying classic theme into ./source and ./sass
mkdir -p source
cp -r .themes/classic/source/. source
mkdir -p sass
cp -r .themes/classic/sass/. sass
mkdir -p source/_posts
git にコミットしておきましょう.
% git add sass source
% git commit -m 'rake install'
ディレクトリ構成
octopress をトップとして,以下の構成を想定しています.
+ octopress
  + source
    + blog   <- (1) YYYY-MM-DD-title.org  として記事を書く
    + _posts <- (2) YYYY-MM-DD-title.html (C-cC-eでpublishした結果)
  + public
    + blog   <- (3) YYYY-MM-DD-title.html (rake generate した結果)
(2) の html には,いわゆる YAML front matter が付いている状態です. (参考: YAML Front Matter · mojombo/jekyll Wiki)
一方,(3) の html は,Jekyll がマクロ展開をして YAML front matter を外した,いわゆる完成形の状態です.
画像を置きたい場合は,blog/dat/img 等のディレクトリを作って置くとよいでしょう. org ファイルからも html からも相対位置が同じになるので扱いやすいです.
Octopress の調整
permalink の設定
org-octopress では,記事のファイル名が yyyy-mm-dd-title.org の形をしていることを前提としています. そこで,octopress/_config.yml の permalink 設定を
permalink: /blog/:year/:month/:day/:title/
から変更して,以下のように
permalink: /blog/:year-:month-:day-:title.html
としておく必要があります.
rsync-exclude の設定
上記ディレクトリ構成を見ると分かるのですが, public/blog 以下にも
*.org ファイルが紛れ込んでしまうので,rsync で deploy してしまわないように
octopress/rsync-exclude ファイルを書きます:
[0-9]*-[0-9]*-[0-9]*-*.org
git push で deploy している人は, .gitignore
に同様の工夫をするといいでしょう.
Emacs の設定
まず, org-mode は 8.0 以降を使ってください. 加えて,以下のパッケージが必要です:
ちなみに,Evernote と連携したい Mac ユーザは,epic もあると便利かもしれません.
最低限の設定は,以下の通りです.
(require 'org-octopress)
(setq org-octopress-directory-top       "~/octopress/source")
(setq org-octopress-directory-posts     "~/octopress/source/_posts")
(setq org-octopress-directory-org-top   "~/octopress/source")
(setq org-octopress-directory-org-posts "~/octopress/source/blog")
(setq org-octopress-setup-file          "~/org-sty/setupfile.org")
~/org-sty/setupfile.org は,各記事から
として読まれるファイルです.以下,僕の設定例です.
#+OPTIONS: H:3 num:nil toc:nil \n:nil @:t ::t |:t ^:nil -:t f:nil *:t <:t
#+OPTIONS: TeX:t LaTeX:t skip:nil d:nil todo:t pri:nil tags:not-in-toc
#+OPTIONS: author:nil
#+OPTIONS: email:nil
#+OPTIONS: creator:nil
#+OPTIONS: timestamp:nil
#+MACRO: more @@html:<!-- more -->@@
#+MACRO: twitter [[http://twitter.com/$1][@$1]]
#+MACRO: github [[https://github.com/$1/$2][$2]]
#+PROPERTY: cache yes
#+STARTUP: odd
#+STARTUP: content
記事の書き方
- M-x org-octopress として記事一覧を表示します.
- w キーで新規記事の執筆を開始します. 日付やタイトルを聞いてきます.既存の記事の上で RET を押すことで,記事を修正できます.
- 記事を書きます. ここが一番難しいところです.
- org-mode の publish コマンドで記事を一括して export します.
- C-cC-e (org-export-dispatch) RET
- "P" "x" "octopress" RET
プレビューで確認します.コマンドラインで
rake preview
としておくと,publish のたびに
localhost:4000に結果が反映されます.public に完成を反映させます.コマンドラインで
rake generate
として,site に delploy 可能な状態にします.
- site に deploy します. github に push したり rsync で本番サイトに deploy します.
その他おすすめの設定など
その他,CSS や日付のフォーマットなど,自分好みに若干変更したカ所を付けておきます. 参考になれば嬉しいです.
diff --git a/_config.yml b/_config.yml
index fb29684..60b4b11 100644
--- a/_config.yml
+++ b/_config.yml
@@ -13,10 +13,10 @@ description:
 # You can customize the format as defined in
 # http://www.ruby-doc.org/core-1.9.2/Time.html#method-i-strftime
 # Additionally, %o will give you the ordinal representation of the day
-date_format: "ordinal"
+date_format: "%Y-%m-%d (%a)"

diff --git a/sass/custom/_colors.scss b/sass/custom/_colors.scss
index 740266a..bb2f141 100644
--- a/sass/custom/_colors.scss
+++ b/sass/custom/_colors.scss
@@ -41,3 +41,18 @@
 //$pre-bg: $base03;
 //$pre-border: darken($base02, 5);
 //$pre-color: $base1;
+
+$emacs-bg: white;
+$emacs-color: black;
+
+$src-bg: $emacs-bg;
+$src-color: $emacs-color;
+
+$example-bg: lighten(#eee8d5, 8);
+$example-color: black;
+
+$main-bg: $emacs-bg;
+
+$pre-bg: $example-bg;
+$pre-border: darken($example-bg, 25);
+$pre-color: $example-color;
diff --git a/sass/custom/_layout.scss b/sass/custom/_layout.scss
index 74c7de9..011f482 100644
--- a/sass/custom/_layout.scss
+++ b/sass/custom/_layout.scss
@@ -6,7 +6,7 @@
 //$header-padding-bottom: 1.5em;

 //$max-width: 1350px;
-//$indented-lists: true;
+$indented-lists: true;

 // Padding used for layout margins
 //$pad-min: 18px;
diff --git a/sass/custom/_styles.scss b/sass/custom/_styles.scss
index 91ffccc..c4ced09 100644
--- a/sass/custom/_styles.scss
+++ b/sass/custom/_styles.scss
@@ -1,2 +1,67 @@
 // This File is imported last, and will override other styles in the cascade
 // Add styles here to make changes without digging in too much
+
+p, li {
+  code {
+    border: none;
+    background: $main-bg;
+  }
+}
+
+table {
+  border-spacing: 0px;
+  empty-cells: show;
+  margin-bottom: 6px;
+//  border-top: 0px;
+}
+
+th, tr, td {
+  vertical-align: top;
+  padding: 5px;
+  border: 1px black solid;
+  border-collapse: collapse;
+}
+
+th {
+  background-color: darken($example-bg, 8);
+  white-space: nowrap;
+  font-weight: bold;
+}
+
+tr, td {
+  background-color: $example-bg;
+}
+
+.figure {
+  text-align: center;
+  margin-bottom: 3em;
+
+  p {
+    margin: 0px;
+    font-size: 80%;
+  }
+
+  img {
+    box-shadow: none;
+  }
+}
+
+pre.src {
+  color: $emacs-color;
+  background-color: $emacs-bg;
+  .linenr {
+    color: lighten($emacs-color, 75);
+  }
+}
+
+dl {
+  padding-bottom: 2em;
+
+  dt {
+    font-weight: bold;
+  }
+
+  dd {
+    padding-left: 2em;
+  }
+}